|
|
|
Somtimes the product
is shipped in two separate boxes to prevent shipping damage. One box
contains the motor and the other the body. Do not panic if you see
some oil in the box as the temporary tape that covers
the holes may got loosen. It does not damage or ruin the product since you
will have to remove the tape anyway!
What to do:
-
take both the log
splitter motor and the main body out of their boxes with extra care.
Dropping them will void the warranty.
-
remove the dip stick oil
measure (part# 10) and check the oil level only if you found
excess oil in the box. Tilt the unit on its end w/o breaking the levers
to measure it.
-
If you need extra oil,
you may use any good quality hydraulic oil sold at Home Depot or
any auto part store. If you cannot locate the recommended type of oil
shown in the manual than you may use the AW-32 hydraulic oil sold
everywhere.
-
If the oil level is between the
two marks (which is marked in to the stick and you may have to use your
nail to touch it) carefully begin to turn the stick clockwise
without tool. After the first 2-3 turns when you
have made sure that it is in good position, you can use wrench to
tighten the nut. The first groove is about 1/2 inch, the other is 2
inches from the end of the dipstick.
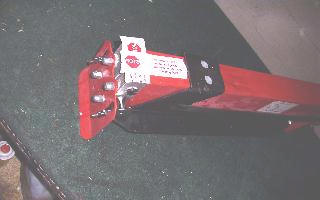
Motor assembly:
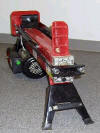
- place the main body on a flat surface with the wood
plate/tapes
upwards to prevent the oil from escaping the system as shown on the
picture below.
- make sure to remove the wooden plate and all the tapes off the oil cylinder
cover so you can get access to the two holes in which the oil flows. You
will find some gray color tape under which must be removed as well and
scraped off with a knife.
- make sure to have the two black rubber O-ring seals on
the unit attached to the motor. (it might have fallen off in the box)
- you can put a tiny amount of grease on the rubber rings
to help them stay in place when placing it on the log splitter body.
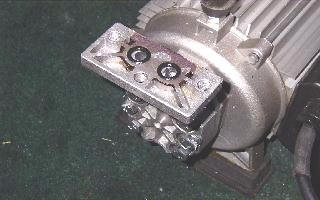
- place the motor on the body with the three holes
aligned properly. THE SCREWS MUST BE
TIGHTENED BY HAND FIRST! If you have to apply excessive force to tighten
them than you did not aligned the screws well and you will STRIP
THE THREADS!!! No claims will be accepted for stripped threads!
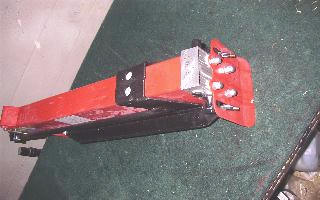
- now you can assemble the leg and the wheels as shown on
page 6-7 in your book.
- place the log splitter on the ground or leave it on the
bench to test its operation. Ground must be somewhat level.
- remove the bleeder screw
completely and run the splitter freely without log 3-4 times then
place a log on it and start splitting.
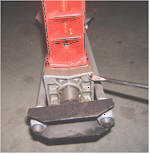 The bleeder screw is
shown on the right corner. The bleeder screw is
shown on the right corner.
|
|
Hints:
- if the oil is leaking from the point where the motor
was assembled onto the body, it means that you did not aligned the motor
properly or the two rubber rings are not in place.
- if you use long extension cord or not high grade cord you have a good
chance that the circuit breaker will go off quickly. (it must be 10-12 gauges
and be plugged in to a 20AMPS single outlet)
Problem: No pressure to split the log
Solution:
-
remove the bleeder screw completely
-
check the oil level.
-
make sure the splitter is in horizontal position
-
do not use longer than 25 feet extension cord and it is an industrial
heavy duty grade.
-
the motor is turned on
-
both hand levers are pushed down
-
the wedge is sharp, apply cooking oil
-
for more hints, please check manual.
=============
Problem: The splitter is too slow and/or does not move forward or retract properly.
Solution:
-
both levers must be operated at the same time
-
not enough oil in the system or the oil is too old
-
unit must be placed on level surface
-
the handle bars (part# 51-55) are off-positioned on the valve. It
happened because the fixing screws (part# 51) were not tightened enough.
Remove the handle seats (part# 52) and the the valve knobs (part# 53).
Locate the valve shaft under the handle seats and align them properly so
the fixing screws and the valve knobs will touch the flat surface on the
valve shaft!
-
For detailed information on how to work around the problem of the
splitter not retracting or the ram not moving forward, please see
http://www.omegastores.com/splitterhelp2.htm
 Problem: Oil is leaking
Solution:
Problem: Oil is leaking
Solution:
-
locate the leaking part
-
if it is leaking from under the handle seat (part# 52) then remove it
along with the valve shaft holder then change the seal inside.
-
if the leak is at the motor assembly: reassemble the motor by making
sure that the rubber seals are in place.
-
if the leakage is found at any other places, please change the seals.
Problem: when the motor is turned on the circuit breaker shuts down.
Solution:
-
If you are using an extension cord, make sure it's 10-12 gauges and not
too long
-
remove the motor
-
run it for about 5-7 seconds
-
reassemble it on to the body. It will remove the air from the system.
-
after the motor is assembled: run the splitter twice without log
-
operate the splitter with log
 NEED
PARTS?
See them at
www.omegastores.com/splitterparts.htm
NEED
PARTS?
See them at
www.omegastores.com/splitterparts.htm
|